Users
This section contains information on creating, managing and removing users.
To learn how to create a new user, watch the following video or read the instructions below.
From the Orchestrator, select "Users" from the left menu.
Select "Add New User" from the user list.
Enter the user name for the new user.
Confirm or enter the IP address for your new user (You can override auto-selected IP addresses if required).
Caution
If you chose to override the auto-selected IP address, ensure you use the BlastShield™ network prefix and that you do not duplicate an address which is already in use.).
Select Orchestrator Admin Privileges (None, Read-Only, Read-Write).
Assign the new user to Groups (Note: groups can be added or modified later if you wish).
Select "Save and Download Invitation" and download the invitation .bsi file.
Note
Give the .bsi file to the new user, who will use it to register to the network the first time.
To learn how to register a new user to your BlastShield™ network, read the following steps.
Important
A new user must install the Desktop client on their computer and the Mobile Authenticator App on their phone and use them register to the BlastShield™ network.
The desktop client will ask for the invitation BSI file during the process to validate the registration and the user will also be required to authenticate their biometrics on their mobile device.
The BSI file is single use and can only be used once. Once you have registered and authenticated for the first time, you will no longer require it.
Summary
Registering is a two step process for the new user and can be summarised as follows.
Install the BlastShield™ Client and Authenticator App
Register to the BlastShield™ network
This is described in detail below.
Install the BlastShield™ Client and Authenticator App
Register to the BlastShield™ network
To learn how to register to BlastShield™, watch the following video or read the steps below.
Launch the BlastShield™ desktop client.
Select Mobile App as the Authentication Method.
Launch your phone's Authenticator app.
Scan the QR code with the Authenticator app.
Go back to the Desktop Client,
Select "Add New" to add yourself to the network.
Select the .bsi file from your client file system, and assign a network name of your choosing.
On your phone's Authenticator app.
Apply your face ID or fingerprint on your phone when prompted and your network is operational.
Note
Once you have registered and authenticated for the first time, you will no longer require the .bsi invitation file.
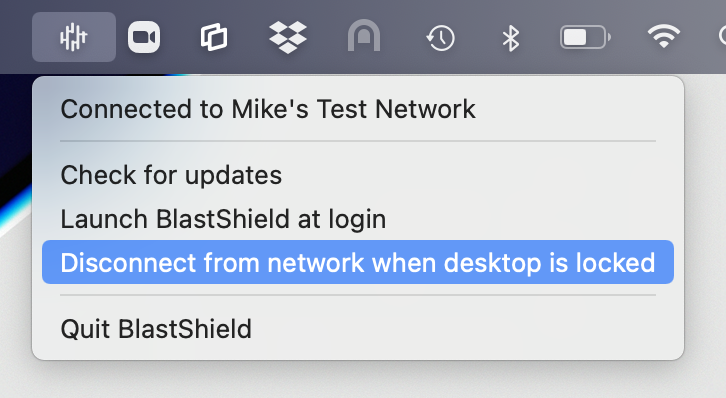
Stay connected when your desktop screen is locked
If you would like the BlastShield™ Client to stay connected when your screen is locked then you can configure this in the Client as described below:
Click on the BlastShield icon on your desktop.
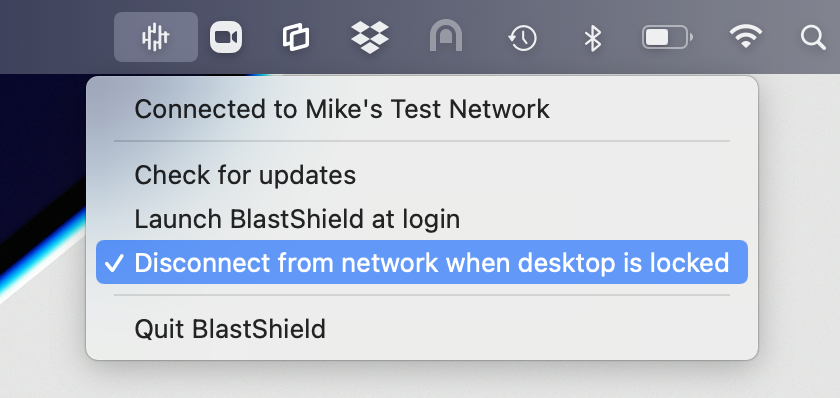
Uncheck the option for Disconnect from network when desktop is locked.
Other Connectivity Options
Most users will use the Desktop Client and the Mobile Authenticator to connect, but we also offer two other methods for connections and authentication. These are:
Network access using the BlastShield™ Mobile Client. Allows you to access the network via your mobile device, eg tablet. Click here to find out more.
Authentication using a FIDO2 compliant key. This is for users who do not have biometric ID support on their mobile device. Click here to find out more.
To learn how to modify a user, watch the following video or read the steps below.
From the Orchestrator, click on the Users menu on the left hand side.
The user list is displayed.
Select desired User from the User List.
Modify the User Name or other attributes.
When finished, select Save Changes.
Note
The changes will automatically be saved and propagated across the network instantly. It may take up to 2 minutes for all changes to be made.
If you modify the protected IP address, ensure that you are not duplicating an existing address on the network.
To learn how to delete a user, watch the following video or read the steps below.
From within the Orchestrator, select "Users" from the Main Menu on the left.
Identify the user to be deleted from the user list.
Select the user
Click the Delete Icon (small trash bin icon on the to[ right).
Confirm to Delete the user