On premise installation of the Orchestrator (x86)
Orchestrator on-premise installation
The BlastShield™ Orchestrator is used to provision and manage all systems in a BlastShield™ network. This includes management of gateways, endpoints, remote users, groups, and policies. The following steps are performed to deploy and install the Orchestrator. Once installed, you will use the Orchestrator to manage and provision all systems within the BlastShield™ Network. Below are the steps to install the Orchestrator:
Request the Orchestrator BSI invitation file from BlastWave. You will require the BSI file when you install the Orchestrator firmware. BlastWave will send you the BSI file by email.
Download the Orchestrator firmware and flash it onto a USB drive. Copy the BSI file onto the USB drive.
Install the Orchestrator firmware on your x86 platform, using the BSI file to register the installation.
If the Orchestrator is being installed behind a NAT gateway, make a port forward of UDP port 12345 to the Orchestrator.
Pre requisites
Before starting, make sure of the following:
You have received an Orchestrator BSI file from BlastWave.
You have downloaded the Orchestrator firmware. You can download it here.
The Orchestrator firmware is designed to run on x86 platforms. The specification for the hardware which we support is given below. Please refer to this when selecting your server.
CPU: Minimum Intel Atom with AES-NI support or Intel Celeron with AES-NI support. Note that more powerful CPUs with AES-NI support such as Core i3 or Xeon are also supported.
RAM: Minimum 8GB
HDD/SSD: Minimum 64GB
NICs: One NIC is required. Most NICs made by Intel, Broadcom and Mellanox are supported.
You will require a USB flash drive to boot your hardware from, and a monitor and keyboard to connect to your server during the installation process.
By default, the Orchestrator expects to receive an IP address via DHCP. Manual assignment is also supported during the installation process.
The Orchestrator will use UDP port 12345 for communications. Please ensure this port is allowed on the firewall.
Download the Orchestrator firmware and flash it to a USB
In this step you will be downloading the BlastShield™ Orchestrator Software Installer. Using the Installer and the Invitation (.bsi) file generated in the previous step you will install the software on your x86 platform and bind it to the BlastShield™ Network. Below are the steps for this process.
Download the Orchestrator firmware here.
Unzip the Installer Package (Do NOT run the Installer file).
Write the Installer image to a USB drive using any available image writer
Note: there are several free utilities available for writing images to USB drives. We recommend the balenaEtcher software, but you can use any utility.
Once you have written the image to the USB, copy the BSI invitation file into the root folder of this image on the USB.
Create a file and name it
authorized_keysThis file should contain a SSH public key which will be used for the admin user in the event that the admin user should SSH to the Orchestrator.
Add the SSH public key to the
authorized_keysfile and copy this file to the root folder of the USB.
Note
The USB should contain the following:
The installer image.
The BSI file.
The
authorized_keysfile.
Install the Orchestrator firmware on the x86 Platform
In this step you will be booting the x86 platform from the USB image created in the previous step.
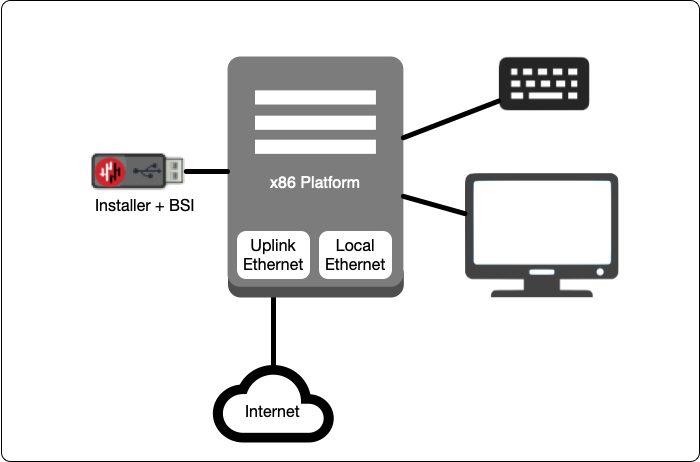
Connect your x86 platform as shown here.
Please watch the following video or read the steps below to learn how to boot the x86 platform from the USB image.
Making sure the x86 server is connected as shown above, power it on and exit the boot sequence using the break key that applies to your hardware, then select the boot setup menu.
Re-boot your server from the USB image, once the image boots you will begin the setup process.
Select the network interface.
Select the invitation (.bsi) file.
Select the target device (hard drive).
Confirm that all data will be erased and the image will be installed on the server
When the installation is complete you will be prompted to remove the USB flash drive (please remove the USB flash drive at this point), and the server will reboot. You can disconnect the monitor and keyboard from the Orchestrator hardware now.
Deployments behind a NAT
If the Orchestrator is installed behind a NAT, please now make a port forward of UDP port 12345 to the Orchestrator.
Testing the Orchestrator
If the Orchestrator is running, then you should be able to register and connect to it. To register for the first time you will use the Desktop client to register and create a name for the new network. The desktop client will ask for the invitation BSI file to validate the registration. You will be asked to authenticate your biometrics on your phone to complete the authentication process.
Please refer to the following article to connect to the Orchestrator for the first time.
https://support.blastwave.io/article/register-and-connect-to-the-blastshield-tm-orchestrator